We’re Ready
To Help
Can’t send emails? How do I set up my email? How do I change my password? If you have one or more of these questions, you’re not alone. View the answers to frequently asked questions below. If you’re question is not answered, please contact our support team at support@enter.net.
Requesting Help
Talk With The Enter.Net Support Team
You can check your server settings by going to your email program (Outlook, Thunderbird, Microsoft office..etc.) and follow the steps below:
Email Programs:
Outlook
- In top menu click on Tools and then E-Mail Accounts (some versions of Outlook may say just Accounts).
- In some versions of Outlook you may need to click on the E-Mail tab.
- Click on Add a new e-mail account… or simply New and then click Next.
See Required Information Below
Mac OS X Mail
- With the Mail application open, click on the File menu and then click Add Account…
- For additional assistance please visit Apple’s Mail Assistant page.
See Required Information Below
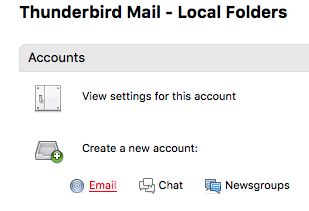
Thunderbird
- Click on the Tools menu, choose Accounts Settings, and click Add Account.
See Required Information Below
Outlook Express/Windows Mail
- Click on the Tools menu, click on Accounts, and then click on the Mail tab.
- Click the Add button and then click on Mail.
See Required Information Below
Entourage for Mac
- Click on the Tools menu, then click Accounts.
- Click on the Mail tab and then click the New button.
See Required Information Below
iPhone/iPad E-Mail
- If this is your first time adding an e-mail account to your iPhone simply launch the Mail app and you will be prompted to create a new account.
- If you are adding or replacing an account open Settings followed by Mail, Contacts, Calendars. Open Accounts and choose Add Account…
- From the list of available e-mail services choose Other. You will be prompted for your server and user information.
See Required Information Below
Android E-Mail
- Open your list of applications and click/touch the E-Mail icon.
- If this is your first time launching the E-Mail application you will be prompted to create a new account.
- To manually add a new account open the E-Mail application, click on your device’s Menu button, and choose Add Account.
- Android settings may vary from provider to provider. If you have difficulty using your e-mail account once you have set it up please contact our support department. We will double check your settings, and refer you to your provider’s support department if necessary.
See Required Information Below
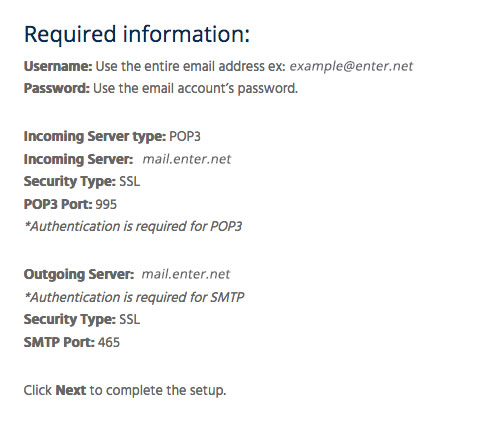
Required Information:
Username: Use the entire email address (ex: info@your-domain.com)
Password: Use the email account’s password
Incoming Server type: POP3
Incoming Server: mail.enter.net
Security Type: SSL
POP3 Port: 995
*Authentication is required for POP3
Outgoing Server: mail.enter.net
*Authentication is required for SMTP
Security Type: SSL
SMTP Port: 465
You should then be able to send and receive messages!
Follow the steps below to unblock your IP address:
Using your internet browser, Go to www.enter.net and click on the pay bill at the top of the page
- Login using the email address you have on file and the password.
- If you do not know your email address on file, you will have to contact us so we can provide it to you.
- If you do not know your password, type your email address and click “request a password reset” It will email you a password to that email address
- Once you login, in the center of the page, click on “Unblock your IP” in blue
You should now be able to access your webmail and website!
Follow the steps below to unblock yourself:
- Go to www.enter.net and click on the pay bill at the top of the page
- Login using the email address you have on file and the password.
2a. If you do not know your email address on file, you will have to contact us to provide it to you.
2b. If you do not know your password, type your email address and click “request a password reset” It will email you a password to that email address
- Once you login, in the center of the page, click on “Unblock your IP” in blue
You should now be able to access your webmail and website!
Here is what to do to change these settings.
- Identify the mail program that is refreshing too frequently.
- Identify the device you are using your email program with.
- Go to www.Google.com and type in the search bar “My _________ (Device) is checking mail too often using _________ (email program)”.
- Choose the correct search result, and follow the instructions step by step.
- Make sure to double check all settings, and “save” when finished.
This will change the settings of your email program, and change the frequency that it try’s to download your messages, which will prevent you from becoming blocked from your account.
Adding your Enter.net Email account to the Gmail app on Android and IOS Using IMAP
- On your Android phone or tablet, open the Gmail app.
- In the top left, tap “Menu”.
- To the right of your username, tap the Down arrow.
- Tap “Add account”.
- Choose the type of account you want to add. To use your email service, select “Other”.
- Follow the steps on the screen to add your account.
- Incoming Server: mail.enter.net
Username: Your email address (example@enter.net or example@entermail.com)
Password: Your email password
Authentication type: SSL
Port: 993 - Outgoing Server: mail.enter.net
Username: Your email address (example@enter.net or example@entermail.com)
Password: Your email password
Authentication type: SSL
Port: 465
Adding your Website Email account to the Gmail app on Android and IOS Using IMAP
- On your Android phone or tablet, open the Gmail app.
- In the top left, tap “Menu”.
- To the right of your username, tap the Down arrow.
- Tap “Add account”.
- Choose the type of account you want to add. To use your email service, select “Other”.
- Follow the steps on the screen to add your account.
- Incoming Server: mail.yourdomain.com
Username: Your email address (example@yourdomain.com)
Password: Your email password
Authentication type: SSL
Port: 993 - Outgoing Server: mail.yourdomain.com
Username: Your email address (example@yourdomain.com)
Password: Your email password
Authentication type: SSL
Port: 465
-
- Open Outlook, and when the Auto Account Wizard opens, choose Next.
NOTE: If the wizard didn’t open or if you want to add an additional email account, on the toolbar choose the File tab.
On the E-mail Accounts page, choose Next > Add Account.
- Choose Manual setup or additional server types > Next
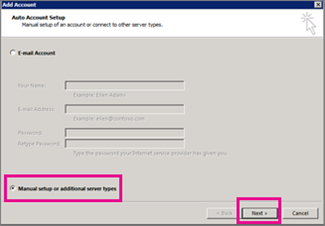
- Select the type of account you need, and choose Next.
Once you get to the Server Settings Page Fill in the required information below.
- Open Outlook, and when the Auto Account Wizard opens, choose Next.


Required information:
Incoming Server: mail.enter.net
Username: Your email address (example@enter.net or example@entermail.net)
Password: Your email password
Authentication type: SSL
Port: 993
Outgoing Server: mail.enter.net
Username: Your email address (example@enter.net or example@entermail.net)
Password: Your email password
Authentication type: SSL
Port: 465
Click Next to complete the setup.
-
- Open Outlook, and when the Auto Account Wizard opens, choose Next.
NOTE: If the wizard didn’t open or if you want to add an additional email account, on the toolbar choose the File tab.
On the E-mail Accounts page, choose Next > Add Account.
- Choose Manual setup or additional server types > Next
- Select the type of account you need, and choose Next.
Once you get to the Server Settings Page Fill in the required information below.
- Open Outlook, and when the Auto Account Wizard opens, choose Next.
Required information:
Incoming Server: mail.yourdomain.com
Username: Your email address (example@yourdomain.com)
Password: Your email password
Authentication type: SSL
Port: 993
Outgoing Server: mail.yourdomain.com
Username: Your email address (example@yourdomain.com)
Password: Your email password
Authentication type: SSL
Port: 465
Click Next to complete the setup.
-
- Have your Outlook Program open.
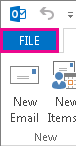
- Click “File”
- Choose, “Add Account”
- A new window will pop up prompting you for an email address, enter the email you wish to connect to Outlook
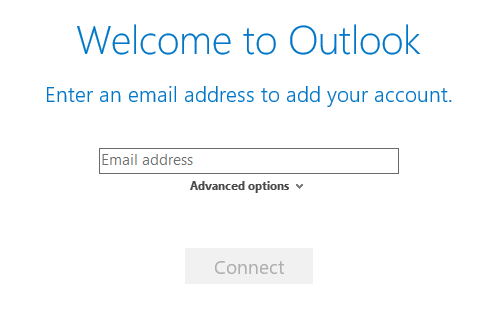
- Click “Advanced Options”, make sure to check the box that reads “let me set up my account manually”
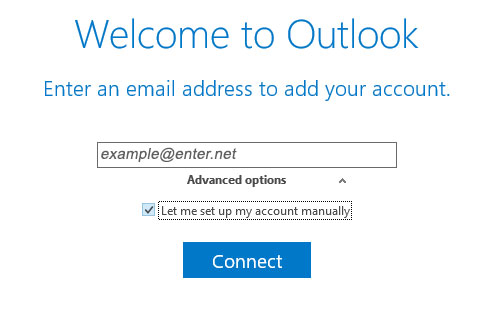
- Click “Connect”
- Now it will ask to “Choose Account Type”, select “IMAP”
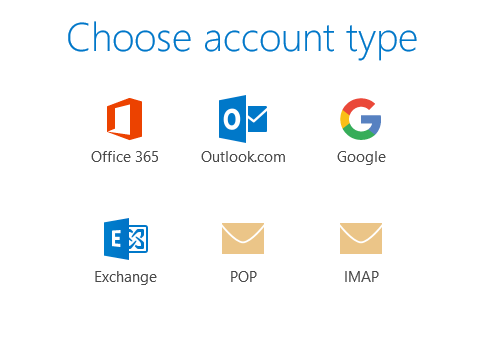
- You must enter the “IMAP Account Settings for example@enter.net”. Click “connect”.
Required Settings:
Incoming Server: mail.enter.net
Username: Your email address (example@enter.net or example@entermail.net)
Password: Your email password
Authentication type: SSL
Port: 993Outgoing Server: mail.enter.net
Username: Your email address (example@enter.net or example@entermail.net)
Password: Your email password
Authentication type: SSL
Port: 465 - Click “Connect”
- A new window will open and prompt you for your password
- Click “Ok”


You have successfully created your Email Address’s email box!
- Have your Outlook Program open.
- Click “File”
- Choose, “Add Account”
- A new window will pop up prompting you for an email address, enter the email you wish to connect to Outlook
- Click “Advanced Options”, make sure to check the box that reads “let me set up my account manually”
- Click “Connect”
- Now it will ask to “Choose Account Type”, select “IMAP”
- You must enter the “IMAP Account Settings for name@yourdomain.com”. Click “connect”.
Required Settings:
Incoming Server: mail.yourdomain.com
Username: Your email address (example@yourdomain.com)
Password: Your email password
Authentication type: SSL
Port: 993Outgoing Server: mail.yourdomain.com
Username: Your email address (example@yourdomain.com)
Password: Your email password
Authentication type: SSL
Port: 465 - Click “Connect”
- A new window will open and prompt you for your password
- Click “Ok”
You have successfully created your Email Address’s email box!
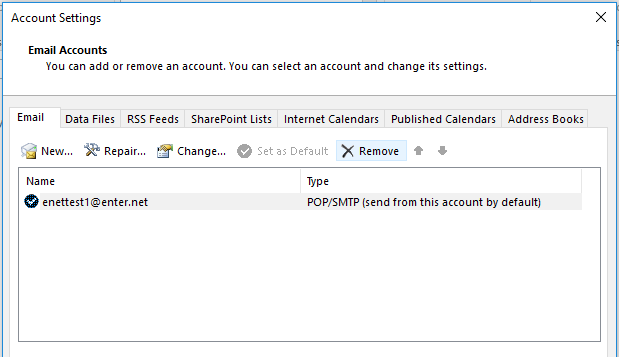
- Open your Outlook program.
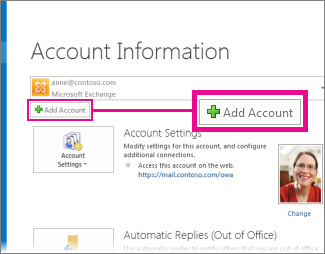
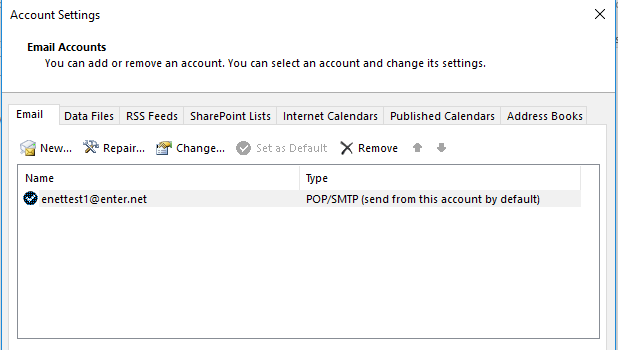
- Click “File”, then “Account Settings”.
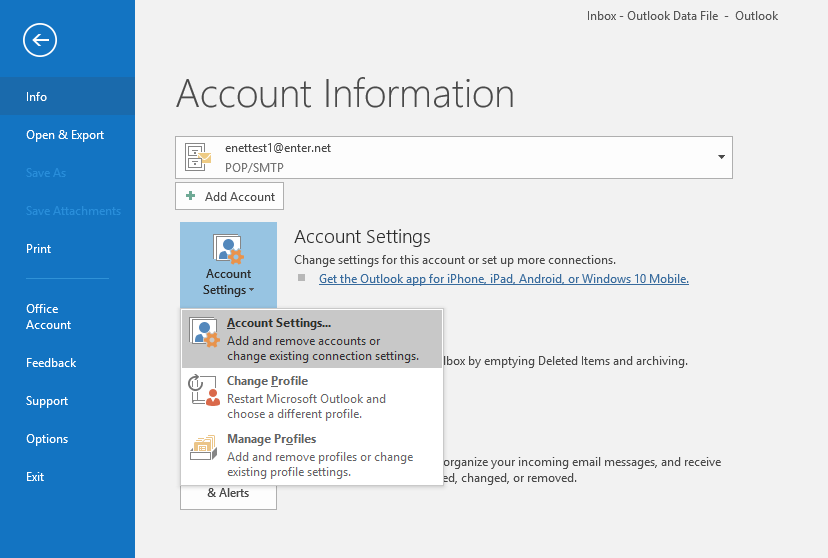
- Click on the Email Address you wish to delete.
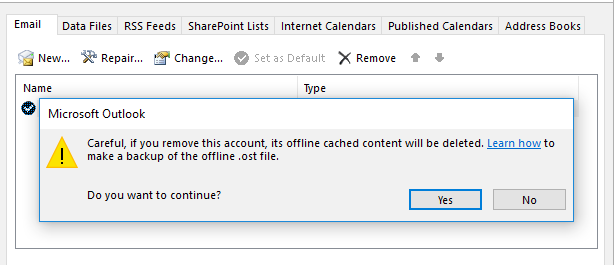
- Click “Remove”.
- Choose “Yes”.
- Click “close”.


The Email Address Box is now uninstalled from the Outlook Program.
- Open your Outlook 2013-2016 program
- Click “File”
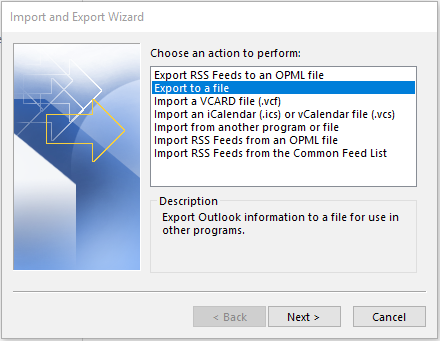
- Choose “Open & Export”
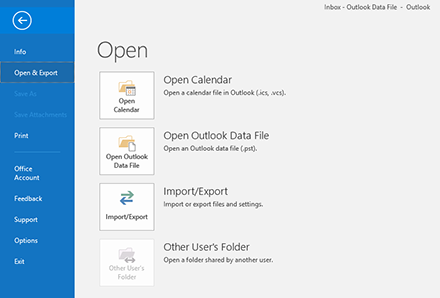
- Click “Import/Export”
- A dialogue box will pop up asking you to “Choose an action to perform”
Select “Export to a file”
- Click “Next”
- Another dialogue box will appear stating “Create a file of type”
Select “Outlook Data File (.pst)”
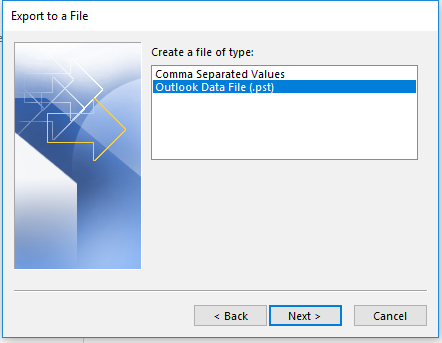
- Click “Next”
- The window will prompt you to “Select the folder to export from”
Choose your email address “youremail@enter.net”
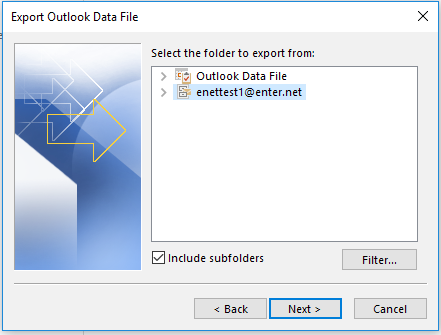
- Click “Next”
- “Save exported file as:”
Outlook automatically sets “Your Documents” as the default location
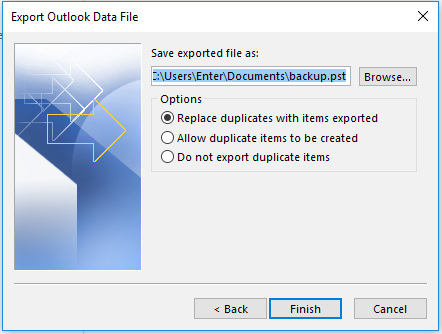
- Click “Finish”.


- If you would like to change your @enter.net or @entermail.net password login to your webmail: webmail.enter.net
- Put in your email address and your current password.
- Once you log in click on your email address up in the top right hand side.
- Choose Password and Security.
- Enter the New Password you would like and type it in again to Confirm New Password. Click Save to update your password.
Adding your Enter.net Email account to the Apple Mail app on IOS Using IMAP
- Go to Settings > Accounts & Passwords and tap “Add Account”.
*If you’re using iOS 10.3.3 or earlier, go to Settings > Mail > Accounts and tap “Add Account”. - Tap Other, then tap “Add Mail Account”.
- Enter your name, email address, password and a description for your account.
- Tap Next. Mail will try to find the email settings and finish your account setup. If Mail finds your email settings, tap “Done” to complete your account setup.
- If Mail can’t find your email settings, then you need to enter them manually. Tap “Next”, then follow these steps
- Choose IMAP for your new account
- Enter the information for Incoming Mail Server and Outgoing Mail Server:
Incoming Server: mail.enter.net
Username: Your email address (example@enter.net or example@entermail.net)
Password: Your email password
Authentication type: SSL
Port: 993Outgoing Server: mail.enter.net
Username: Your email address (example@enter.net or example@entermail.net)
Password: Your email password
Authentication type: SSL
Port: 465 - Then tap “Next”
- If your email settings are correct, tap “Save” to finish. If the email settings are incorrect, you’ll be asked to edit them.
Adding your Website Email account to the Apple Mail app on IOS Using IMAP
- Go to Settings > Accounts & Passwords and tap “Add Account”.
*If you’re using iOS 10.3.3 or earlier, go to Settings > Mail > Accounts and tap “Add Account”. - Tap Other, then tap “Add Mail Account”.
- Enter your name, email address, password and a description for your account.
- Tap Next. Mail will try to find the email settings and finish your account setup. If Mail finds your email settings, tap “Done” to complete your account setup.
- If Mail can’t find your email settings, then you need to enter them manually. Tap “Next”, then follow these steps.
- Choose IMAP for your new account
- Enter the information for Incoming Mail Server and Outgoing Mail Server:Incoming Server: mail.yourwebsite.com (replace with the address of your website)
Username: Your email address (example@yourwebsite.com)
Password: Your email password
Authentication type: SSL
Port: 993Outgoing Server: mail.yourwebsite.com (replace with the address of your website)
Username: Your email address (example@yourwebsite.com)
Password: Your email password
Authentication type: SSL
Port: 465 - Then tap “Next”
- If your email settings are correct, tap “Save” to finish. If the email settings are incorrect, you’ll be asked to edit them.
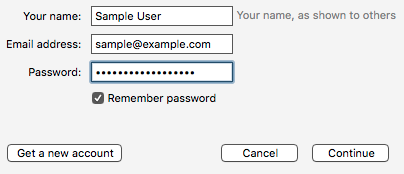
Entering Account Information
If you are launching your local e-mail client for the first time after you installed it you will most likely be prompted to create a new account as soon as you launch the program, regardless of which application you are using. The following steps will start the process of adding a new e-mail account to your local client. Once you have completed these steps you will see a screen that asks for the server and user information.
Required information:
Incoming Server: mail.enter.net
Username: Your email address (example@enter.net or example@entermail.net)
Password: Your email password
Authentication type: SSL
Port: 993
Outgoing Server: mail.enter.net
Username: Your email address (example@enter.net or example@entermail.net)
Password: Your email password
Authentication type: SSL
Port: 465
Email Programs:
Outlook
- In top menu click on Tools and then E-Mail Accounts (some versions of Outlook may say just Accounts).
- In some versions of Outlook you may need to click on the E-Mail tab.
- Click on Add a new e-mail account… or simply New and then click Next.
Mac OS X Mail
- With the Mail application open, click on the File menu and then click Add Account…For additional assistance please visit Apple’s Mail Assistant page.
Thunderbird
- Click on the Tools menu, choose Accounts Settings, and click Add Account.
Outlook Express/Windows Mail
- Click on the Tools menu, click on Accounts, and then click on the Mail tab.
- Click the Add button and then click on Mail.
Entourage for Mac
- Click on the Tools menu, then click Accounts.
- Click on the Mail tab and then click the New button.
iPhone/iPad E-Mail
- If this is your first time adding an e-mail account to your iPhone simply launch the Mail app and you will be prompted to create a new account.
- If you are adding or replacing an account open Settings followed by Mail, Contacts, Calendars. Open Accounts and choose Add Account…
- From the list of available e-mail services choose Other. You will be prompted for your server and user information.
Android E-Mail
- Open your list of applications and click/touch the E-Mail icon.
- If this is your first time launching the E-Mail application you will be prompted to create a new account.
- To manually add a new account open the E-Mail application, click on your device’s Menu button, and choose Add Account.
- Android settings may vary from provider to provider. If you have difficulty using your e-mail account once you have set it up please contact our support department. We will double check your settings, and refer you to your provider’s support department if necessary.
Entering Account Information
If you are launching your local e-mail client for the first time after you installed it you will most likely be prompted to create a new account as soon as you launch the program, regardless of which application you are using. The following steps will start the process of adding a new e-mail account to your local client. Once you have completed these steps you will see a screen that asks for the server and user information.
Required information:
Incoming Server: mail.yourdomain.com
Username: Your email address (example@yourdomain.com)
Password: Your email password
Authentication type: SSL
Port: 993
Outgoing Server: mail.yourdomain.com
Username: Your email address (example@yourdomain.com)
Password: Your email password
Authentication type: SSL
Port: 465
Email Programs:
Outlook
- In top menu click on Tools and then E-Mail Accounts (some versions of Outlook may say just Accounts).
- In some versions of Outlook you may need to click on the E-Mail tab.
- Click on Add a new e-mail account… or simply New and then click Next.
Mac OS X Mail
- With the Mail application open, click on the File menu and then click Add Account…For additional assistance please visit Apple’s Mail Assistant page.
Thunderbird
- Click on the Tools menu, choose Accounts Settings, and click Add Account.
Outlook Express/Windows Mail
- Click on the Tools menu, click on Accounts, and then click on the Mail tab.
- Click the Add button and then click on Mail.
Entourage for Mac
- Click on the Tools menu, then click Accounts.
- Click on the Mail tab and then click the New button.
iPhone/iPad E-Mail
- If this is your first time adding an e-mail account to your iPhone simply launch the Mail app and you will be prompted to create a new account.
- If you are adding or replacing an account open Settings followed by Mail, Contacts, Calendars. Open Accounts and choose Add Account…
- From the list of available e-mail services choose Other. You will be prompted for your server and user information.
Android E-Mail
- Open your list of applications and click/touch the E-Mail icon.
- If this is your first time launching the E-Mail application you will be prompted to create a new account.
- To manually add a new account open the E-Mail application, click on your device’s Menu button, and choose Add Account.
- Android settings may vary from provider to provider. If you have difficulty using your e-mail account once you have set it up please contact our support department. We will double check your settings, and refer you to your provider’s support department if necessary.
- On the window that pops up, select Skip this and use my existing email to proceed to the Mail Account Setup screen.
- Enter your Name, Email Address (ex: example@enter.net), and the Password associated with the email account and click Continue.
Now you will need to configure the account by selecting IMAP, clicking Manual config, and using the settings below.

Required information:
Incoming Server: mail.enter.net
Username: Your email address (example@enter.net or example@entermail.net)
Password: Your email password
Authentication type: SSL
Port: 993
Outgoing Server: mail.enter.net
Username: Your email address (example@enter.net or example@entermail.net)
Password: Your email password
Authentication type: SSL
Port: 465
Click Done to complete the setup.
- On the window that pops up, select Skip this and use my existing email to proceed to the Mail Account Setup screen.
- Enter your Name, Email Address (ex: name@yourdomain.com), and the Password associated with the email account and click Continue.
Now you will need to configure the account by selecting IMAP, clicking Manual config, and using the settings below.
Required information:
Incoming Server: mail.yourdomain.com
Username: Your email address (example@yourdomain.com)
Password: Your email password
Authentication type: SSL
Port: 993
Outgoing Server: mail.yourdomain.com
Username: Your email address (example@yourdomain.com)
Password: Your email password
Authentication type: SSL
Port: 465
Click Done to complete the setup.

Version: Horde Groupware Webmail Edition 5.1.1
Application website: The Horde Project
Interface type:
-
-
- Three-pane format with view pane
- Mobile interface available
-
Composition features:
-
-
- Attachments
- HTML composition
- Spell check
-
Organization features:
-
-
- TFolder manipulation
- Mail filters
- Message flags
- Search mail
- Threaded conversation view
-
Additional features:
-
-
- Address book
- Calendar
- Task list
- Event reminders
- News feed
- Notes
-
Recommended for: Users who need a full suite of features that includes mobile email access and advanced productivity tools.

Version: Roundcube Webmail 1.0.6
Application website: Roundcube Webmail Project
Interface type:
-
-
- Three-pane format with view pane
-
Composition features:
-
-
- Attachments
- HTML composition
- Spell check
-
Organization features:
-
-
- Drag-and-drop organization
- Folder manipulation
- Message flags
- Search mail
- Threaded conversation view
-
Additional features:
-
-
- Address book
- System administrators can use plugins to add custom features
-
Recommended for: Users who need a user-friendly web interface with some additional features available.
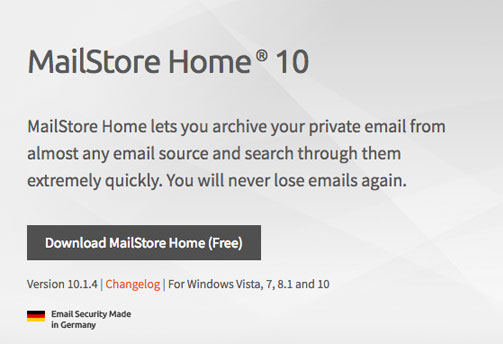
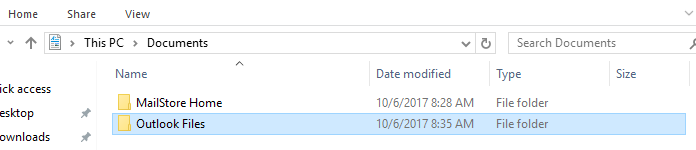
Note: MailStore Home WILL NOT work on OSX devices. (Mac, Macbook Pro, etc..)
- Click on the link below to begin your MailStore Home download.
MailStore Home Download for Windows
- Click “Download”, and “Install on this computer”.
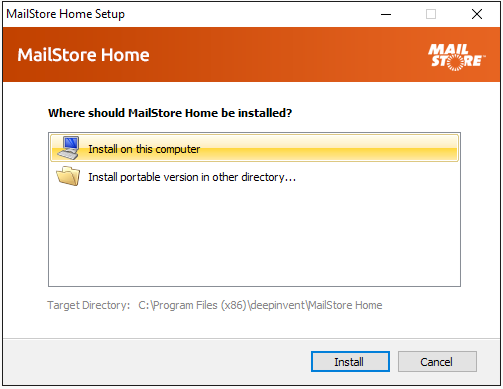
- Follow the step by step instructions by clicking “Next” at each dialog step

- When complete, click “Finish”
- Open the newly installed program – MailStore Home
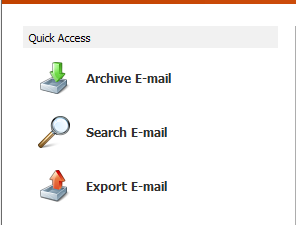
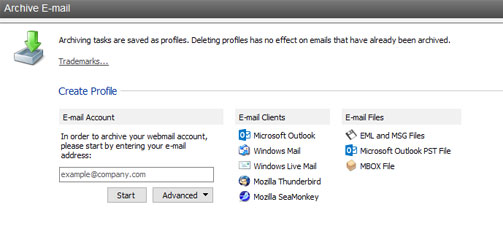
- Click “Archive E-mail”
- Under e-mail Clients, select the E-mail program that you are currently using
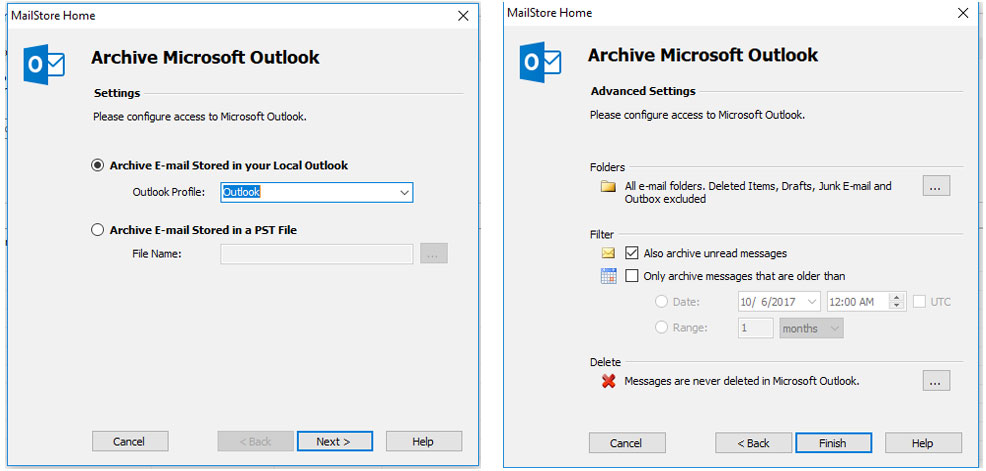
- A dialog box will pop-up. Click “Next”, “Next”, “Finish”.
- Click “OK” at the dialog box.
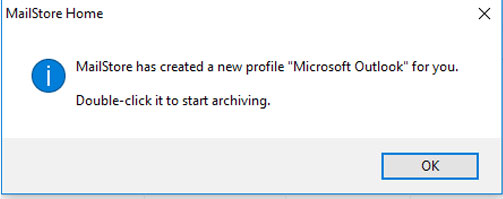
- Under “Profiles”, make sure the profile you just created is highlighted.
Click “Run” in the box to the right. (This will transfer your E-mail messages onto MailStore Home)
- On the lefthand side, click the dropdown arrow under “My Archive”.
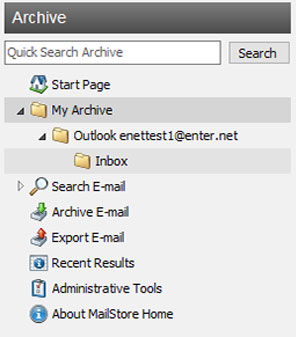
- Select the E-mail account you have just archived.
Note: The Inbox and other folders containing E-mails should be archived in this location.
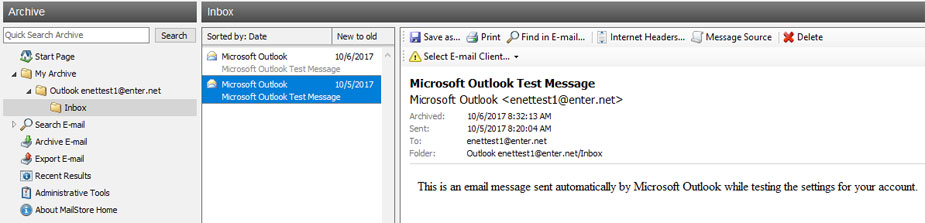


You have successfully transferred your E-mails onto your MailStore Home program!
Note: These messages will be saved as a .pst file, which can be imported into Outlook, Thunderbird, Windows Live, and other various E-mail programs.
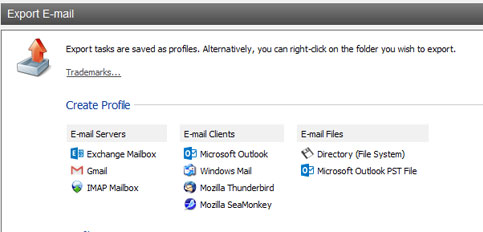
- Go back to the Start Page, here you will see the “Export E-mail” option.
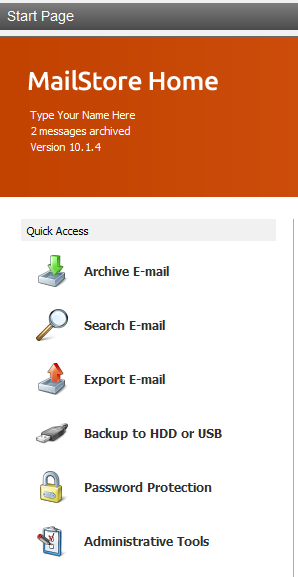
- Click “Export E-mail”.
- Under the “Create Profile” section, choose the mail program you wish to import to.
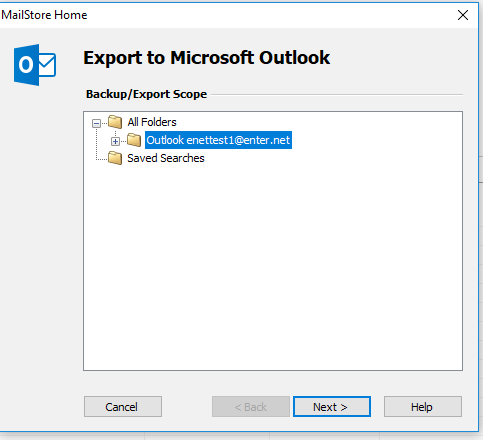
- Under “Backup/Export Scope” choose your archived E-mail Account.
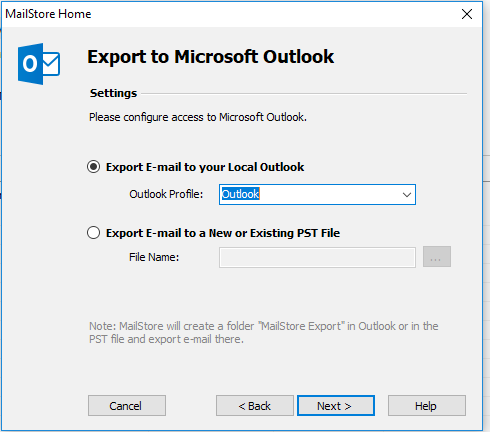
- Follow the onscreen dialog box options, click “Next” to finish.
- Click “Run” to generate the exported files, available to readily import.
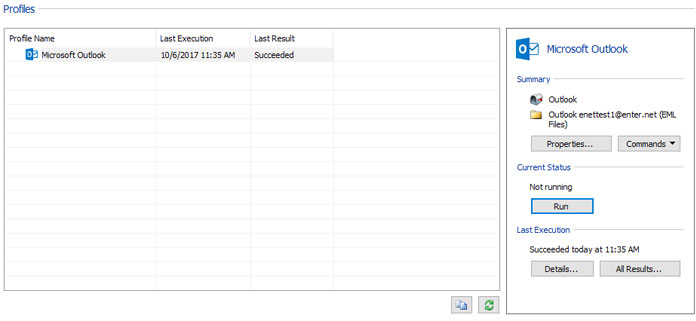
- The exported file will be located in the “My Documents” directory.
- In the “Exported Client Type Directory” will be the “.pst” file containing your messages that is ready to be imported into an alternate mail program.


You have successfully downloaded your messages as a file that is ready to be imported!
- Open your MacMail program
- Open the “Mail” tab at the top left of the screen
a. For first set-up you will be automatically directed to the “Add Account” prompt
b. If MacMail has been previously used, you will need to choose “Add Account” within the “Mail” drop-down
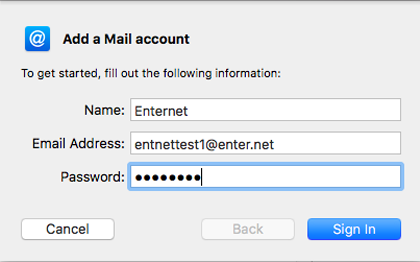
- Within the “Add Account” prompt, choose “Add Other Mail Account”…click “Continue”

- Under “Add a New Mail Account”, input your full name, full email address, and password…click “Sign In”
- You will now be prompted for the “Account Type”, “Incoming Mail Server”, and “Outgoing Mail Server”
a. Use the required information below to input into your settings
b. Click “Sign In”
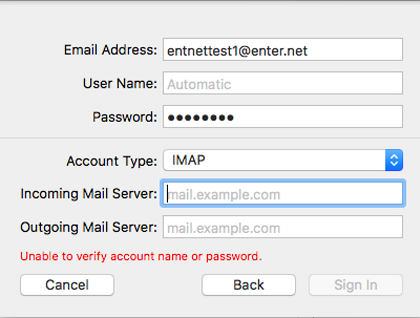
Note: Email Only Customers use “mail.enter.net” | Website Customers use “mail.yourdomain.com” - A window will now appear asking which app’s you would like to be connected to your email account
a. Select “Mail” along with any other app’s you would like associated with your email
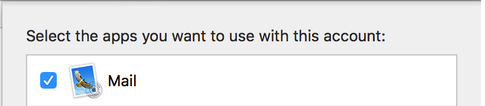
b. Click “Done”

- Now that your Enter.Net account has been created on MacMail, select “Preferences” within the “Mail” tab.
a. While on the “Preferences” window, click “Accounts” - Choose your account located on the left hand column, and click on the “Advanced” tab
a. Uncheck the box that reads “Automatically detect and maintain account settings” - Navigate back to the “Account Information” tab
a. Click the “Outgoing Mail Server (SMTP)” drop-down menu, and select “Edit SMTP Server List” - You will be directed to the “SMTP Server List”, double check to make sure the correct email address has been selected, and select the “Advanced” tab
a. Verify that the box “Automatically detect and maintain account settings” is unchecked
b. Enter “465” as the “Outgoing Mail Port”
c. Check the box to “Use SSL”
d. Click on the “Authentication” drop-down, and select “Password”
e. Check the box that reads “Allow insecure authentication”
Note: If you do not see this option, you may need to update your device or your MacMail to the latest operating version. - Double check that the settings are accurate. Click “Ok”


You have successfully set-up your Enter.Net account to your MacMail program!
Need Additional Help?
We’re Here
Fill out our form so that we can respond to you via e-mail
(610) 437-2221, option 2
- Or Call Us Toll Free
(877) 368-3711, option 2
Please Note: If you are having problems sending or receiving e-mail, it may not be possible to offer adequate support via e-mail. For these types of issues, please call our support department by phone at your convenience.